REPLACE SHIFT SHAFT AND SHIFT DRUM STAR ON THE RX3


Drain oil. (Refer to CSC tutorial https://www.cscmotorcycles.com/check-out-our--rx3-oil-change)
Draining coolant. *only on a cool engine
- Place a large catch pan under motorcycle.
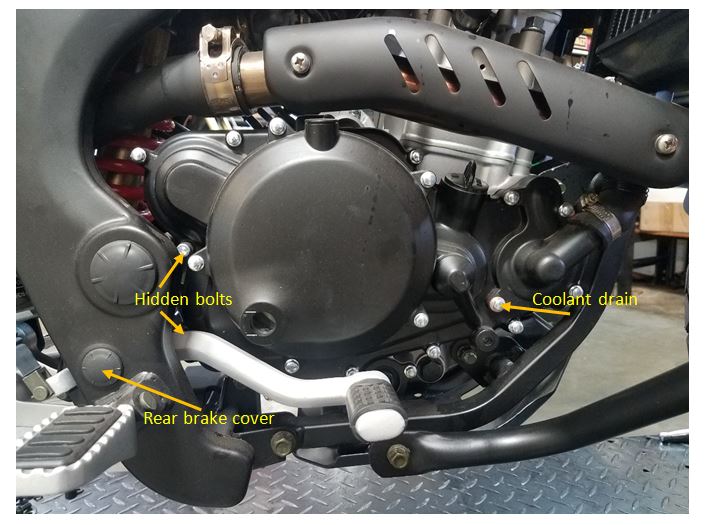
- Locate the waterpump cover on the front part of right engine case cover. Remove the coolant drain screw (lower left 8mm waterpump bolt with copper washer behind it) Removing the radiator cap will help speed up draining
- Remove the remaining (3) 8mm bolts on the water pump cover and position it out of the way to allow access for the right side cover to be removed. Bungee cords are helpful with this
Removing the rear brake lever
- Take off the plastic cap on the frame above the right foot peg
- Using a 15mm wrench from behind and 12mm deep socket, unscrew the rear brake lever pivot and position the lever out of the way to gain access.
Removing the right side engine cover
- Using a short 5mm allen key crack loose the (2) allen bolts that are hidden behind the frame. They can be completely loosened with a ball allen but can not be removed.
- Continue to remove the remaining (8) 8mm bolts around the perimeter of the engine case cover. The (5) clutch cover bolts do not need to be removed.
- Carefully pull off the cover.There are (3) pry points to help remove the cover as evenly as possible
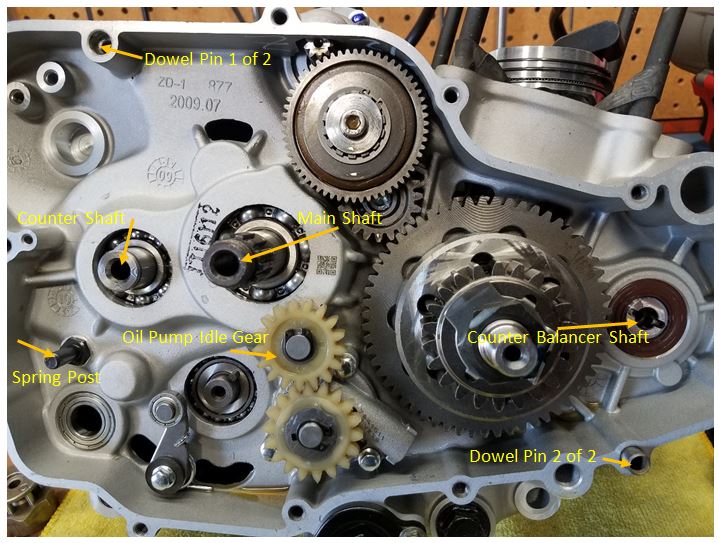
- Keep track of the two dowel pins located on the top left and bottom right of the case.

Removing the clutch assembly
- Unscrew the (6) six 8mm bolts that hold down the clutch pressure plate and springs.
- Remove the pressure plate, pushrod and bearings. Keep track of the order of the clutch pushrod, roller bearing, and washer that’s behind the pressure plate. *washer likes to stick to the pressure plate
- With a flat screwdriver or chisel, bend back the lock washer on the clutch hub. Completely flatten the washer by lightly tapping it with a 27mm socket.
- Remove the hub nut. If using an impact stuffing a rag around the hub will help keep the hub from spinning freely. If you need to keep the hub stationary use the “hub tool”
- Pull out the clutch basket and clutch hub (with plates still installed) off the main shaft as an assembly.
- Behind the clutch on the main shaft keep track of the (2) roller bearings, inner race, and thrush washer.
- With the shift shaft and shift drum exposed, take this opportunity to shift through the gears and witness going through all the gears. You will have to spin either the main shaft or rear wheel for the gears to completely engage.

Removing the shift shaft
- Remove gear shifter lever
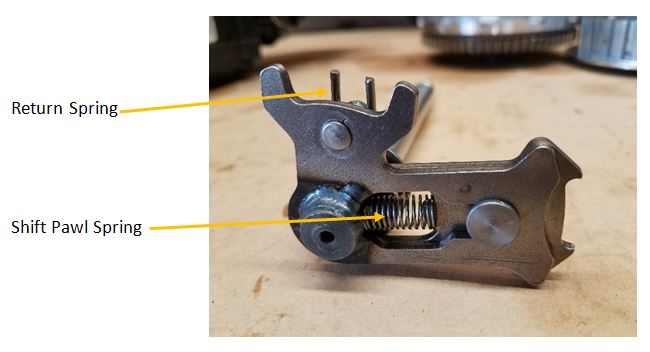
- Pull out spring that pushes the shift pawl forward to allow clearance between the pawl and shift star.
- Pull back inner shift pawl and remove shift shaft assembly
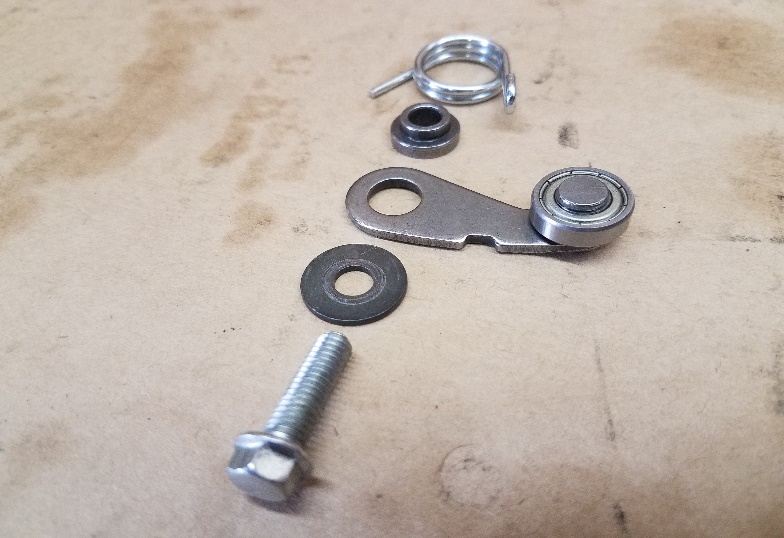
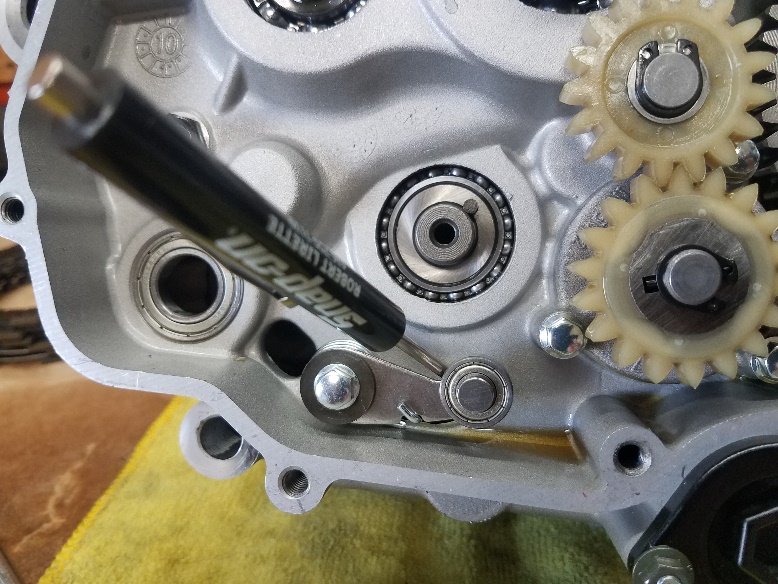
- Unscrew 8mm bolt from gear shift drum stopper. *stopper is under spring tension, it will pop when it is completely loosened. Pay attention to order of the bolt, flat washer, stopper, collared washer (collar facing out toward stopper) and spring
- Unscrew 5mm allen bolt from center of shift drum star and remove center. Shift drum may move when loosening but will stop

Installing the shift drum stopper
- Place parts in order: bolt, flat washer, stopper arm with notch facing down, collared washer (small end fits inside stopper arm), spring
- Hook spring in notch of stopper
- Install stopper with notch facing down and use blue Loctite on bolt

Install shift drum STAR
- Prep 5mm allen bolt with blue Loctite and insert in the center of the shift drum star
- Carefully pull down the spring loaded stopper with your thumb. Place a small flat screwdriver lodged in the bottom opening of the case and lock down the stopper making enough room for the drum star. Install the star making sure to line up with the pin on the drum. Another set of hands would be useful
- Torque bolt to 7 lbs
- Carefully release the screwdriver, taking care not to damage the engine case.
Install shift shaft
- Install new shift shaft seal
- Install shift shaft, lining up the center return spring to the spring post, pull back the shift pawl slightly to clear the shift drum
- Install spring to engage shift pawl
- Install shifter
Shift through the gears to verify proper function. You will have to spin either the main shaft or rear wheel for the gears to completely engage.


Install clutch assembly
- First install a thrush washer, inner race and the two (2) roller bearings on the mainshaft.
- Install the clutch basket making sure to line up the plastic oil pump idle gear with the gear behind the clutch basket. You can ensure proper alignment by spinning the oil pump gear as you install the basket.
- Install outer thrush washer
- Install clutch hub and locking washer
- Apply red loctite to the threads of the mainshaft and install nut.
- Prevent the clutch hub from spinning with hub tool and torque nut to 45lbs.
- Slightly tighten or loosen nut to allow the lock washer tab to fold onto a flat side of the clutch hub nut
- Install clutch fiber and steal plates in an alternating order, starting and ending with a fiber plate.
- Install clutch pushrod with roller bearing and flat washer
- Install pressure plate and clutch springs with collared washers and 10mm bolts. Hand tight only
Install right side cover
- Install the two (2) dowel pins
- Place gasket on engine case with a little grease to hold it in place.
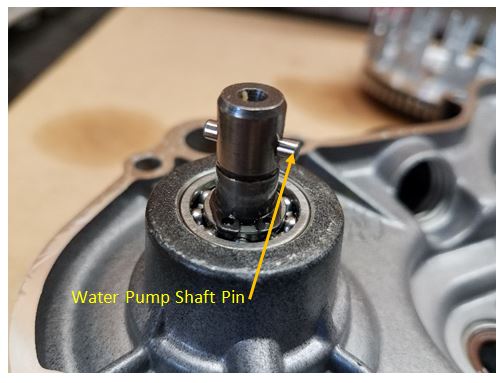
- Turn the water pump shaft pin to line up with the front counter balancer slot
- Install the two (2) allen head bolts on the left side of the case.
- Install cover paying close attention to align the crankshaft seal and water pump shaft. Jigglingthe impeller will help seat the waterpump.
- Install the waterpump cover along with the remaining bolts and torque in a crisscross pattern to 7lbs
- Verify proper clutch and gear operation.
- Replace oil and coolant and check for leaks
- Install brake lever and verify proper operation