RX4 Fuel Filter Replacement Tutorial
This tutorial addresses how to replace the RX4’s fuel filter.
General Information
Procedure
Insert the ignition key in the left side panel and remove the rear seat.


Remove the two 8mm bolts securing the front seat and remove the front seat.


Remove the two 8mm bolts at the rear of the fuel tank.

Remove the 5mm Allen bolt from the left side panel and remove the side panel. You can allow it to hang by the motorcycle side; you do not need to disconnect the seat latch cable from the panel.


Similarly remove the right body panel from the motorcycle.


Remove the four 5mm Allen bolts securing the fuel tank upper body panel.

Remove the motorcycle fuel tank upper body panel.

Remove the 5mm Allen bolts at the rear of the left and right lower fuel tank body panels.


Remove the two 5mm Allen bolts at the front of the fuel tank.

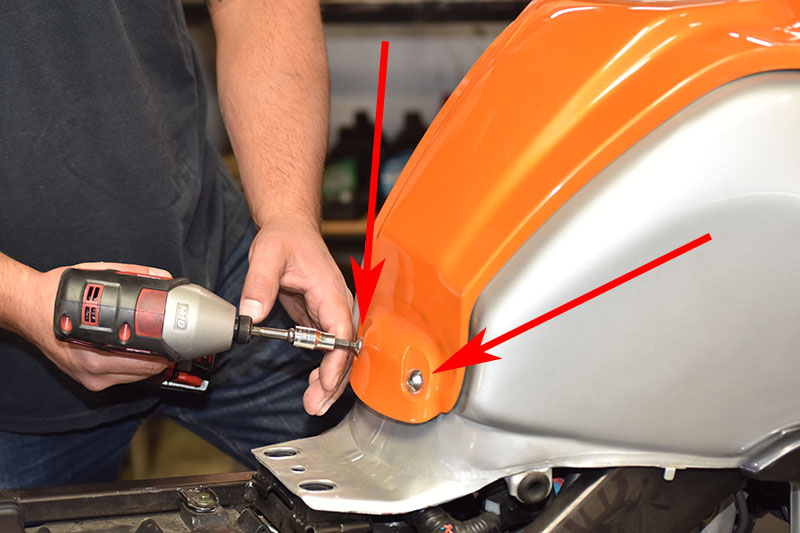
Remove the 3mm Allen bolts from the front of the left and right forward body panels.

Remove the Phillips-head screws beneath the forward portion of the left and right forward body panels.

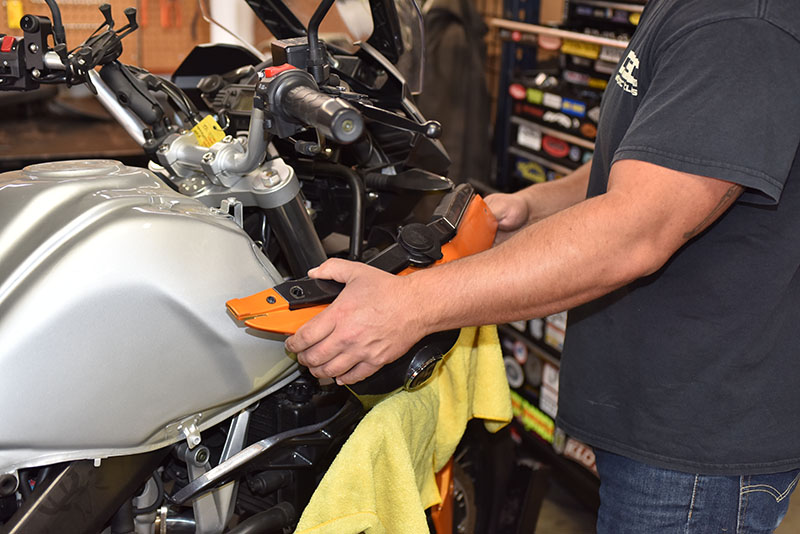
Drape a cloth over the right motorcycle engine guards to prevent scratching the forward body panels during removal.

Remove the forward body panels.

Disconnect the electrical connector from the right forward panel.

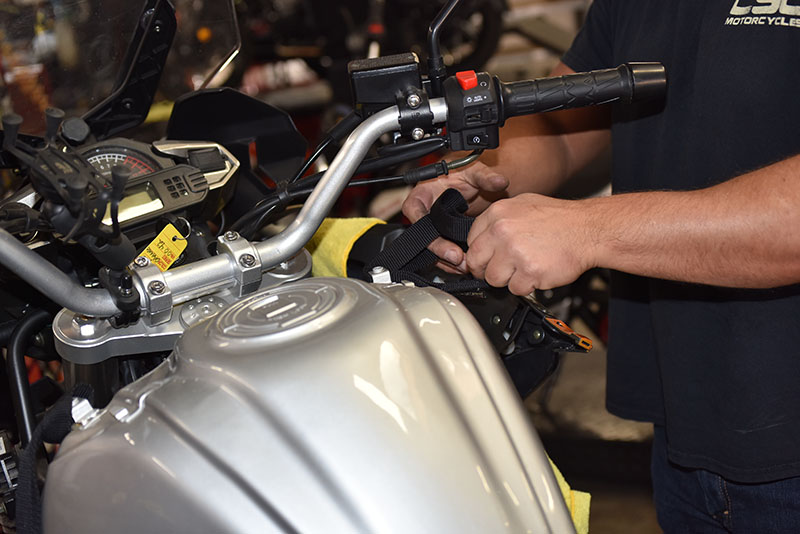
At this point, the fuel tank can be rotated up and away from the engine without disconnecting any of the fuel hoses or electrical wires. Use narrow web straps or rope to secure the fuel tank on both the left and right sides as shown below. The straps or rope attach to the fuel tank panel mount near the front of the fuel tank and the passenger foot peg bracket. Lift the fuel tank up at the rear and remove the rubber biscuit. Insert a cloth behind the fuel tank to prevent scratching the fuel tank. Shift the fuel tank about an inch to the rear and allow it rest on the cloth. Tighten the straps or rope to secure the fuel tank as shown below to provide access to the fuel filter.


Once the fuel tank is raised in the manner shown below, the fuel filter is visible beneath the fuel tank.

The fuel ports in the fuel tank will require plugging in the next step. We use plugs made of short sections of fuel hose, open on one end and plugged on the other, as shown below.

Remove the fuel lines from the fuel tank and plug the fuel tank ports as shown below (two fuel tank ports need to be plugged). The fuel tank lines disconnect from the fuel tank by squeezing the locks on the fittings and pulling the fittings off the fuel tank access ports.


The fuel filter is mechanically attached to the underside of the fuel tank by a rubber mount. Remove the fuel filter and mount from the fuel tank, remove the fuel lines attached the fuel filter, and remove the fuel filter from its rubber mount.


Install the rubber mount on a new fuel filter. After replacing the fuel filter, reassemble the motorcycle (assembly is the reverse of disassembly).
Components and Parts
CSC Motorcycles stocks replacement fuel filters. Please call us at (800) 884-4173 for replacement parts.
General Information
- The RX4 fuel filter is mounted underneath the fuel tank. To gain access to it, you need to remove the seats and the body panels, and you need to lift the fuel tank.
- The RX4 fuel filter is not a serviceable item; it must be replaced.
- The RX4 fuel filter should be replaced every 5000 miles.
- Tools required for replacing the fuel filter include an 8mm socket, an 8mm wrench, a 3mm Allen wrench, a 5mm Allen wrench, a 6mm Allen wrench, an 8mm Allen wrench, a 10mm Allen wrench, a Phillips-head screwdriver, web straps or rope, and two fuel line plugs fabricated from short sections of fuel line (illustrated in the photos below).
Procedure
Insert the ignition key in the left side panel and remove the rear seat.
Remove the two 8mm bolts securing the front seat and remove the front seat.
Remove the two 8mm bolts at the rear of the fuel tank.
Remove the 5mm Allen bolt from the left side panel and remove the side panel. You can allow it to hang by the motorcycle side; you do not need to disconnect the seat latch cable from the panel.
Similarly remove the right body panel from the motorcycle.
Remove the four 5mm Allen bolts securing the fuel tank upper body panel.
Remove the motorcycle fuel tank upper body panel.
Remove the 5mm Allen bolts at the rear of the left and right lower fuel tank body panels.
Remove the two 5mm Allen bolts at the front of the fuel tank.
Remove the 3mm Allen bolts from the front of the left and right forward body panels.
Remove the Phillips-head screws beneath the forward portion of the left and right forward body panels.
Drape a cloth over the right motorcycle engine guards to prevent scratching the forward body panels during removal.
Remove the forward body panels.
Disconnect the electrical connector from the right forward panel.
At this point, the fuel tank can be rotated up and away from the engine without disconnecting any of the fuel hoses or electrical wires. Use narrow web straps or rope to secure the fuel tank on both the left and right sides as shown below. The straps or rope attach to the fuel tank panel mount near the front of the fuel tank and the passenger foot peg bracket. Lift the fuel tank up at the rear and remove the rubber biscuit. Insert a cloth behind the fuel tank to prevent scratching the fuel tank. Shift the fuel tank about an inch to the rear and allow it rest on the cloth. Tighten the straps or rope to secure the fuel tank as shown below to provide access to the fuel filter.
Once the fuel tank is raised in the manner shown below, the fuel filter is visible beneath the fuel tank.
The fuel ports in the fuel tank will require plugging in the next step. We use plugs made of short sections of fuel hose, open on one end and plugged on the other, as shown below.
Remove the fuel lines from the fuel tank and plug the fuel tank ports as shown below (two fuel tank ports need to be plugged). The fuel tank lines disconnect from the fuel tank by squeezing the locks on the fittings and pulling the fittings off the fuel tank access ports.
The fuel filter is mechanically attached to the underside of the fuel tank by a rubber mount. Remove the fuel filter and mount from the fuel tank, remove the fuel lines attached the fuel filter, and remove the fuel filter from its rubber mount.
Install the rubber mount on a new fuel filter. After replacing the fuel filter, reassemble the motorcycle (assembly is the reverse of disassembly).
Components and Parts
CSC Motorcycles stocks replacement fuel filters. Please call us at (800) 884-4173 for replacement parts.